Hardware Timetracker

Recently, a colleague of mine whipped up a nice Time-Tracking service hosted as a FirebaseApp. You log in with your Google account, clock in, clock out, clock your breaks... the usual stuff.
However, as anyone who ever tried to use time tracking surely knows - you kinda ... tend to forget. Forget to start your break or end it. Maybe forget clocking out even. Nice - all the time is now messed up. Bragging rights just vanished.
So I had a thought... what if it were a physical device that could interface with this service? Surely those already exist but I don't care - I wanna build one!
"Looks plausible and doable! So how would it work?" you ask?
Let me tell you so you don't need to read my handwriting.
Docking Station
the focus here is syncing Hardware <> Backend
- charges the device during working hours
- syncs the state of handheld device to the backend and back
- triggers dock/undock events such as clocking in/out or logging a break
- keeps the handheld device in a known place during work hours to make it less likely to forget
Handheld Device
the focus here is size and portability.
- it has a battery that lasts a weekend (🤞)
- it is authoritive (e.g. start work timer on the train)
- it has a backlit screen to show you statistics and time targets
- it is small enough to always carry around; if you forget to bring it, what's the point?
Together
the focus is hassle-free usage
- easy syncing
- easy charging
- premium feel
Bill of Materials
For this project I got myself 2 variants of each to more quickly tinker around and get something going and have a fallback if one doens't work out or I want to redesign.
Main Board:
- Waveshare ESP32-C6 Touch (1.47")
- ESP32-C3
Screens:
- Waveshare ESP32-C6 Touch (1.47") - 172 x 320 px
- SSD1306 Backlit OLED Display Module (0.96") - 128 x 64 px
Haptics / Feedback:
- 3-5V Micro DC Vibration Motor (8 x 2 mm)
- 0.5W 80 Ohm Mini Speaker (13 x 4 mm)
Batteries:
- 600mAh 3.7V LiPo (30 x 20 x 6 mm)
- 300mAh 3.7V LiPo (40 x 13 x 5 mm)
- 18650 Lithium Battery Charger
- TP4057 Lithium Battery Charger
Juicy Extras:
- 5 pin Pogo-Pin connectors (yeah! Magnets!)
Designing
Note, for all 3D designs here I use Plasticity
it's kinda different (from Maya/3DSMax) but ultra useful for tech stuff
One thing when buying abroad is that it takes ages to arrive;
but thankfully the parts come with schematics letting us build them in CAD to test-fit them.

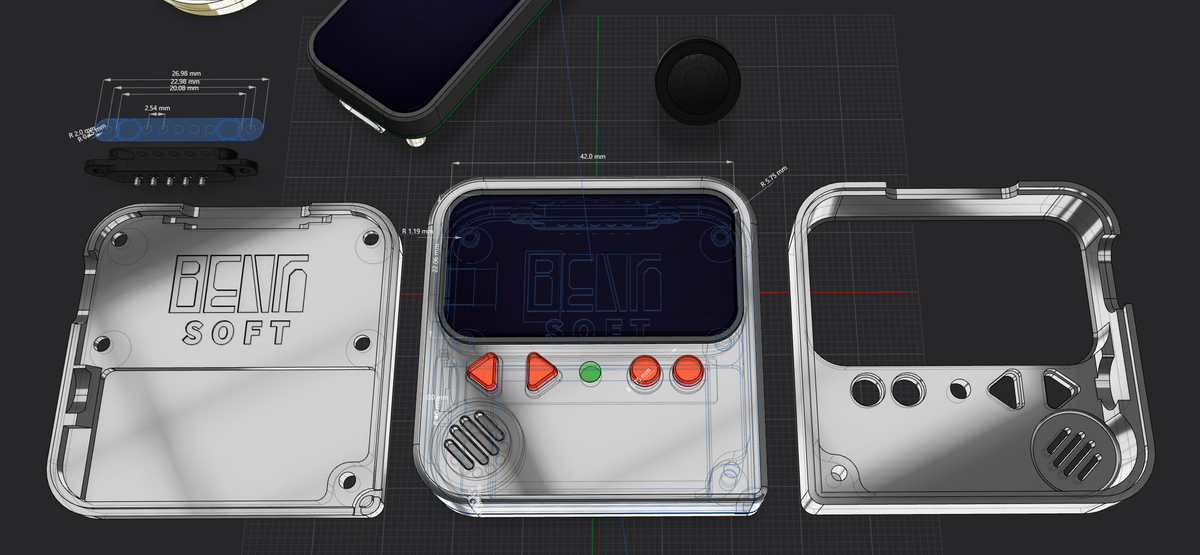
As seen above, I built all the parts in Plasticity which I'm still learning. This allowed me to get an idea of the actual scale of the items and - ultimately - the scale the device would have.


So TLDR: I was silly and looked at the wrong schematic numbers for the screen and didn't account for the bezel. Also, the speaker turned out bigger than expected so I just required more room.
A more square format would allow me to tuck the long but flat battery further away, making room for the speaker and button row.


(1 EUR for scale) On the right I adjusted the screen according to the new scale; evidently a fuckup on my part. 😄 it won't fit and keeps growing
What I ended up with* was a slightly wider format with a snap-fit screen module and decreased thickness (pogo pin no longer on the bottom side).


Note just how useful Sectional/Planar Analysis is in tools like Plasticity (or Fusion360) seeing inside and having a highlight of overlaps helps a lot to get tight tolerances right.
It was really fun to design it in 3D without having to manufacture it yet.
Things I'd do differently if I had to start over - plan in the screws to connect the two halves together beforehand.
The tolerances on the screen module are very low so the screen isn't moving much, and the back plate screws into the screen. However, only one screw (bottom middle in picture) currently really holds it together.
Of course I could use something like Clips to ensure the device stays together.
For 3D printing that's totally valid; however, the plan is to machine this out of aluminium with limited DOF.
The limiting factor of machining it means no clips, no overhangs, no rotating the part.

The prototyping for the electronics and chassis building will follow in another post.
Sometime. 😄